Steering the Marstek Venus D with Homeassistant while your EV charges with a go-e Wallbox
A plug-in battery with zero feed-in and an 11 kW wallbox don't get along: the moment your EV starts charging, the Venus D happily dumps its entire capacity into the car. Here's how I used Home Assistant, the go-e Charger API and Modbus to make the battery cover only my house.


In my last post I integrated my Marstek Venus D battery into Home Assistant's Energy Dashboard with accurate power flow tracking. That was the monitoring part. This time we're going to control the battery - because as soon as I plugged my EV into the go-e wallbox, I discovered a rather expensive design flaw in my setup.
The Challenge
The Venus D runs in anti-feed mode (Nulleinspeisung): it watches the Shelly Pro 3EM CT readings at the main distribution board and outputs exactly as much power as the house is consuming, up to its 800W AC limit. That works beautifully - until the wallbox kicks in.
Here's the problem: the go-e Charger sits behind the same CT clamps as everything else. When the car starts charging at up to 11 kW, the Venus D doesn't know that's an EV. It just sees the house consumption exploding and does what it was told: discharge at full throttle to compensate.
Let's do the math on why that's pointless:
- My Venus D holds 7.56 kWh and can discharge at max 800W
- My car requests around 18 kWh for a typical charge session (measured in HA during the first couple weeks)
- So the battery drains itself completely over ~6 hours, contributing maybe 4-5 kWh to the car - a drop in the bucket
- Meanwhile the house battery is empty for the night, exactly when I need it most
I'm literally paying for battery wear cycles to shave a rounding error off a charging session. What I actually want: while the EV charges, the battery should only cover the house base load - not the car.
The Venus D has no concept of "ignore this one load" though. The Marstek app offers no such feature. So we need Home Assistant to detect when the wallbox is charging and actively throttle the battery - then restore normal anti-feed operation when charging stops.
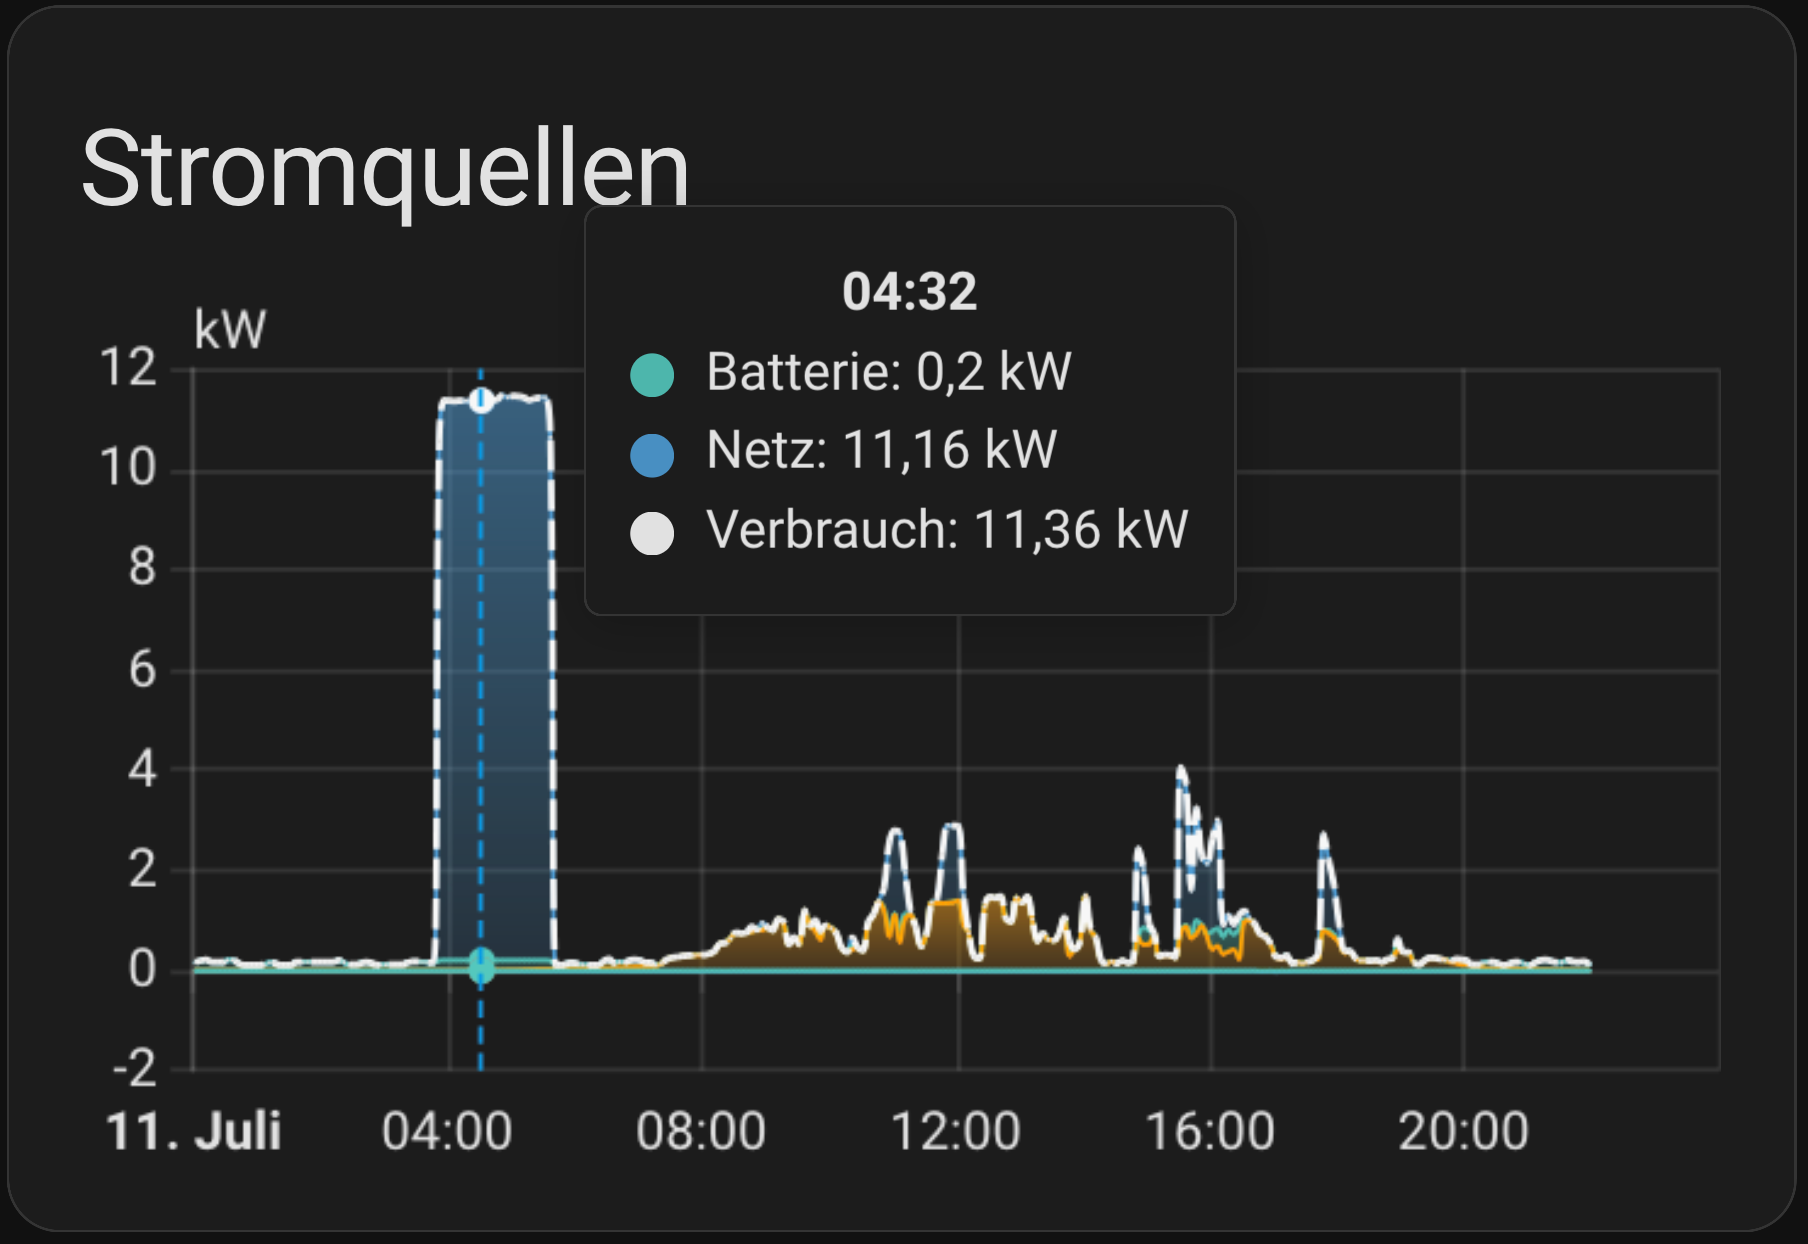
Here is how it looks like for me now daily in my Homeassistant:
Prerequisites
This builds directly on the previous post. You should already have:
- The Marstek Venus D integrated via the Marstek Venus Modbus integration and an RS485 gateway
- Anti-feed (Nulleinspeisung) working via the Shelly Pro 3EM CT setup
- A go-e Charger (I have the go-e Charger Gemini) connected to your network with the HTTP API v2 enabled in the go-e app under Internet → Advanced Settings - but any charger should work that can be monitored via Homeassistant
What You'll Need
- go-eCharger API v2 integration by marq24 (HACS)
- The Marstek Venus Modbus integration from the last post
- About 30 minutes
Part 1: Integrating the go-e Charger
The ha-goecharger-api2 integration talks to the charger's local HTTP API v2 - no cloud, instant state updates.
- Add the repository to HACS: Integrations → Custom repositories
- Install "go-eCharger APIv2 Connect"
- Restart Home Assistant
- Add via Settings → Devices & Services with your charger's IP address
You'll get a lot of entities (the API exposes basically every internal register of the charger). The one we care about is the car state sensor:
sensor.goe_319111_car_valueThe 319111 part is your charger's serial number - yours will differ. This sensor reports the vehicle status as a human-readable string: Bereit (idle, no car), Laden (charging), Warte auf Fahrzeug (waiting for car), Ladung beendet (charging finished). The Laden state is our trigger - it's only active while current is actually flowing into the car.
Part 2: The Control Surface - Taking Over via Modbus
Now for the interesting part. The Marstek Modbus integration doesn't just expose sensors - it exposes writable registers. Four of them matter for us:
| Entity | What it does |
|---|---|
switch.marstek_venus_modbus_rs485_steuermodus | Enables RS485 control mode - the master switch that lets external commands override the firmware logic |
select.marstek_venus_modbus_erzwungener_modus | Force mode: charge, discharge, or standby |
number.marstek_venus_modbus_maximale_entladeleistung | Maximum discharge power limit |
number.marstek_venus_modbus_entladeleistung_einstellen | The actual discharge power setpoint |
select.marstek_venus_d_benutzer_modus | The user work mode - this is where anti_feed lives |
And here's where the challenges started. Figuring out how these registers interact cost me several evenings and a few involuntary "why is the battery doing nothing at all" moments:
Challenge 1: You must enable RS485 control mode first - and then wait. Writing to the force mode or power registers while RS485 control is off silently does nothing. No error, no feedback, the values just don't stick. Worse: even after flipping the switch, the Venus D needs a moment before it actually accepts commands. Sending the force mode immediately after enabling RS485 control failed intermittently. A 5 second delay fixed it reliably.
Challenge 2: There are two discharge power registers, and you need both. My first attempt only set entladeleistung_einstellen (the setpoint) to 200W - and the battery kept discharging at 800W. It turns out the maximum discharge power register acts as a ceiling that the setpoint is validated against, and depending on timing the firmware would clamp or ignore my setpoint. Setting both registers to 200W made the limit stick every time.
Challenge 3: Getting back to anti-feed is the fragile part. This was the real head-scratcher. My first version simply switched RS485 control mode off when charging stopped, expecting the battery to resume its old behavior. Instead it just sat in standby doing nothing - the force mode was still latched to discharge with a 200W limit, and the firmware didn't resume the CT-based logic on its own. The reliable sequence turned out to be:
- Set force mode to
standby(release the forced discharge) - Reset the setpoint to 0 and the maximum back to 800W
- Set the user work mode to
anti_feed- and here's the neat part: writing the user work mode makes the firmware deactivate RS485 control mode automatically. No need to switch it off yourself; the battery hands control back to its own CT logic.
Challenge 4: Trust, but verify. During testing, the write to the user work mode occasionally didn't take (Modbus over an RS485-to-WiFi gateway is not exactly a transactional protocol). If that happens silently, the battery stays in standby all night while you import grid power at full price. So the automation waits 15 seconds after the reset sequence and checks whether the user mode actually reads anti_feed. If not, I get a push notification on my phone telling me to check manually.
Part 3: The Automation
Here's the full automation. One automation handles both directions - charging started and charging stopped - using trigger IDs:
yaml
alias: "Marstek: Entladeleistung auf 200W begrenzen während E-Auto lädt"
description: >-
  Wenn das E-Auto lädt: RS485 aktivieren, force_mode auf discharge,
  beide Entladeleistungs-Register auf 200W. Beim Ende: force_mode standby,
  Register zurücksetzen, user_work_mode auf anti_feed (Firmware deaktiviert
  RS485 automatisch). Verifizierung mit Benachrichtigung bei Fehler.
triggers:
  - trigger: state
    entity_id: sensor.goe_319111_car_value
    to: "Laden"
    id: charging_started
  - trigger: state
    entity_id: sensor.goe_319111_car_value
    from: "Laden"
    id: charging_stopped
actions:
  - if:
      - condition: trigger
        id: charging_started
    then:
      # Take over: enable RS485 control, then force a 200W discharge cap
      - action: switch.turn_on
        target:
          entity_id: switch.marstek_venus_modbus_rs485_steuermodus
      - delay:
          seconds: 5
      - action: select.select_option
        target:
          entity_id: select.marstek_venus_modbus_erzwungener_modus
        data:
          option: discharge
      - action: number.set_value
        target:
          entity_id: number.marstek_venus_modbus_maximale_entladeleistung
        data:
          value: 200
      - action: number.set_value
        target:
          entity_id: number.marstek_venus_modbus_entladeleistung_einstellen
        data:
          value: 200
    else:
      # Hand back: release force mode, reset registers, restore anti-feed
      - action: select.select_option
        target:
          entity_id: select.marstek_venus_modbus_erzwungener_modus
        data:
          option: standby
      - action: number.set_value
        target:
          entity_id: number.marstek_venus_modbus_entladeleistung_einstellen
        data:
          value: 0
      - action: number.set_value
        target:
          entity_id: number.marstek_venus_modbus_maximale_entladeleistung
        data:
          value: 800
      # Setting the user work mode auto-disables RS485 control mode
      - action: select.select_option
        target:
          entity_id: select.marstek_venus_d_benutzer_modus
        data:
          option: anti_feed
      # Verify the battery is really back in anti-feed mode
      - delay:
          seconds: 15
      - if:
          - condition: not
            conditions:
              - condition: state
                entity_id: select.marstek_venus_d_benutzer_modus
                state: anti_feed
        then:
          - action: notify.mobile_app_your_phone
            data:
              title: "Marstek nicht zurückgesetzt"
              message: >-
                Die Marstek Venus D konnte nach dem Ladevorgang nicht auf
                anti_feed zurückgesetzt werden. Bitte manuell prüfen –
                Nulleinspeisung könnte inaktiv sein.
mode: restart
Replace goe_3193111 with your charger's serial and notify.mobile_app_your_phone with your own notification target.
Why 200W and not 0W?
Because the goal isn't to shut the battery down - it's to make it cover only the house. My base load (fridge, network gear, servers, standby consumers) hovers between 120W and 200W. With the cap in place, the battery keeps supplying that base load from solar-charged energy while the wallbox pulls its kilowatts from the grid. Pick a value that matches your own idle consumption - your Energy Dashboard from the last post will tell you exactly what that is.
Why mode: restart?
The car state sensor can flap. When you plug in, the charger may briefly bounce between Warte auf Fahrzeug and Laden while negotiating with the car - I've seen the automation fire twice within 10 seconds. With mode: restart, a new trigger simply aborts the running sequence and starts over with the latest state, so the battery always ends up matching what the wallbox is actually doing. The default single mode would drop the second trigger and potentially leave the battery in the wrong state.
Part 4: Does It Work?
Yes - and it's quite satisfying to watch in the Energy Dashboard. When the car starts charging:
- Grid import jumps to the full wallbox power (as it should)
- Battery discharge drops to a flat 200W line covering the base load
- Battery SoC stays where it is
When charging stops, the automation hands control back, the firmware resumes its CT-based anti-feed dance, and the discharge curve starts tracking house consumption again. The battery is still not getting empty at night, which was the whole point.
Troubleshooting
The battery ignores force mode / power commands
RS485 control mode is off, or you wrote too quickly after enabling it. Make sure the switch.turn_on comes first and keep the 5 second delay. If it still fails, check that your RS485 gateway isn't dropping writes - a flaky WiFi connection to the gateway shows up as exactly this symptom.
Discharge power won't go below 800W
You only set the setpoint register. Set both maximale_entladeleistung and entladeleistung_einstellen.
Battery stays in standby after charging ends
The restore sequence didn't complete - this is exactly what the verification step and the notification are for. Manually set the user work mode back to anti_feed (via the select entity or the Marstek app) and check your automation traces under Settings → Automations → your automation → Traces to see which step failed.
The automation fires multiple times when plugging in
Normal - that's the state negotiation between charger and car. mode: restart handles it. If it bothers you in the logbook, you can add a for: "00:00:05" to the triggers, at the cost of a slightly delayed reaction.
Conclusion
The Venus D's anti-feed mode is great, but it's blind: it can't tell a fridge from an 11 kW wallbox. With the go-e Charger's local API as the trigger and the Marstek Modbus registers as the control surface, Home Assistant can bridge that gap - throttling the battery to base load while the EV charges and restoring full zero-feed operation afterwards.
Also I take care not to overly use the modbus registers and wear them out but trying to mimic anti-feed-in using Homeassistant. This is too slow anyways and a plain 200W feed-in is perfect for my house. Those couple extra watts here and there make no big difference.
The key insights: always enable RS485 control mode first (and give it a moment), always write both discharge power registers, and use the user work mode write as the clean hand-back that auto-disables external control. And because Modbus over a WiFi gateway offers no delivery guarantees, verify the final state and let your phone tell you when something went sideways.
Next up: I'm thinking about making this smarter - only throttling the battery when there's no PV surplus, so summer charging sessions can still skim the solar overproduction. But that's a post for another day.
Additional Resources
- Integrating Marstek Venus D into Home Assistant - The previous post this builds on
- go-eCharger APIv2 integration - The HACS integration for the go-e Charger
- Marstek Venus Modbus Integration - Provides the writable Modbus registers
- go-e HTTP API v2 documentation - Official API key reference (what
car,amp,alwetc. mean) - Home Assistant Automation Modes - Why
restartmatters here