Configuring IPv6 with Sophos UTM 9 and KabelDeutschland

With almost every private customer contract from KabelDeutschland (KD) you'll get DS-Lite with a Carrier-grade IPv4 NAT and an IPv6 Prefix routed to your very own IPv6 Gateway - in most cases this is just your cable modem or router.
I'am using a Sophos UTM - formerly known as Astaro Security Gateway - for years now with IPv6 and want to explain how you can use it too in your network.
IPv4 and IPv6 at KabelDeutschland
At first you need to make sure that you're using a KD modem and not a router. If you have a router you can enable the "Bridge mode" in your KD Customer Center which essentially degrades your router to a basic modem and your UTM behind can fetch it's public IP addresses, otherwise you will get private LAN addresses which is not what we want.
At KD you'll get private IPv4 adresses and all of your connections are being routed to a very large CG-NAT server. Therefore no port forwardings are possible anymore for IPv4. But the good part is that your UTM will get an IPv6 address and a public(!) delegated /64 prefix for all devices behind it. The single IPv6 address assigned to your UTM will act as the router IP for the internet so everyone from the IPv6 internet know where to send packets to reach a device in your delegated prefix. It's just the gateway address for your prefix.
With a public /64 prefix you can assign one public IPv6 address to an incredible amount of 18.446.744.073.709.551.616 devices at home. That sounds enough, huh?
Getting IPv6 running on the UTM
At first you need to enable IPv6 on the UTM by navigating to "Interfaces & Routing" -> "IPv6" an clicking the on/off slider in top right corner of the "Global" tab.
A few seconds later you'll see your IPv6 details KD gave you. It will look like this:
Native over External (WAN): 2a02:8109:8000:14:b8:8424:4afb:c6de
                         Subnet: NONE
            Delegated Prefix: 2a02:8109:4e03:3df::/64
Your UTM will now be reachable from the IPv6 internet at the address 2a02:8109:8000:14:b8:8424:4afb:c6de. You can ping and traceroute that address which leads to the external interface of your UTM where your KD modem/router is attached to.
Before you can assign public IPv6 addresses from your delegated prefix you need to assign one IP to your internal interface where the devices which should get one are attached. Go to the "Interfaces" Menu in "Interfaces & Routing" and edit the internal interface of your choice and give that interface an IP of your prefix like this. You can essentially use every IP out of your prefix here.
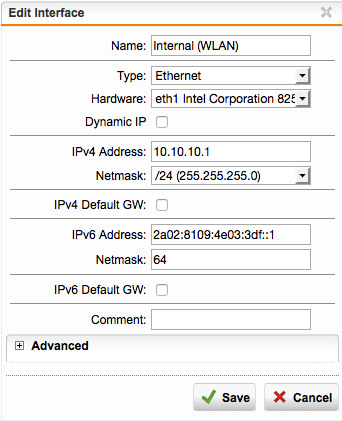
Now this interface's IPv6 address will act as the gateway and dns server for all devices in that network.
Activate prefix assignment for your internal network
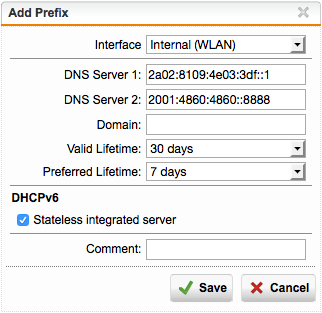
Now it's time to give your devices in that internal network some IPv6 love. For that we will enable Prefix Assignment (Router Advertisement) on that internal network by navigating to the "Prefix Assigment" Tab in the "IPv6" Menu. Now create a new Prefix Assignment for your internal network like in the picture below. A second DNS server is optional but in case the UTM's misbehaves or is not available the clients can use the second one which is the Google DNS IPv6 address in my case.
Save that and enable that prefix assigment. After a few more seconds all of your devices in that internal network should get an IPv6 address out of that delegated prefix. The devices will auto negotiate free addresses themselves. By default they'll use their interfaces MAC address as the second part of the prefix but on all major operating systems to date the IPv6 privacy extensions are enabled by default so they'll choose a random address on their own which changes from time to time automatically.
What if the prefix changes in the future?
Of course KD can assign you a very different delegated prefix in the future. To automatically get new IPv6 addresses for your devices the UTM has a feature called "Automatic renumbering" which will do exactly that. Upon a prefix change it will send out the new prefix to your devices so they can catch up with it.
To enable that feature go to "Interfaces & Routing" -> "IPv6" in the "Renumbering" tab and just click "Allow automatic IPv6 renumbering" and save afterwards. The UTM will do the rest if the prefix changes some time.
Test your IPv6 enabled devices
Of course we want to test our devices if they really running on dual-stack now. You can easily check that by going to test-ipv6.com.
If you can see your IPv4 and the IPv6 address of your UTM (2a02:8109:8000:14:b8:8424:4afb:c6de) then you're good to go!
By default you have a masquerading rule for internal networks to reach the internet. This also applies to IPv6 now. This is why you don't see your devices IPv6 address on those websites. But you can still reach your device with it's own IPv6 address from the internet as soon as you create a firewall rule which allows access to it (for example "Internet IPv6" -> "SSH" -> "Your devices IPv6 address" to allow access to SSH from the internet to your device. This also adds kind of a security layer like in the old NAT for IPv4 days.
If you don't want NAT anymore for IPv6 - congratulations! IPv6 was designed to get rid of NAT. Read on if you want to know how to do only NAT for IPv4.
Getting rid of IPv6 NAT/Masquerading for the internal network
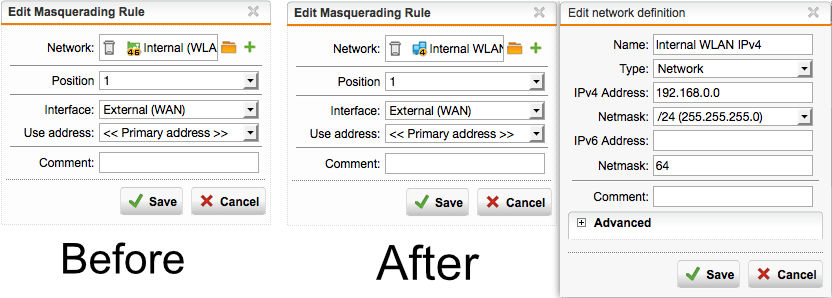
You can easily get rid of IPv6 Masquerading by using a custom network definition for your internal network which only contains the IPv4 definitions instead of using the "Internal (LAN) v4/v6" definition. Here is a picture of before and after for your convenience. After that, revisit test-ipv6.com and you will see your devices IPv6 there and not the UTM's one.
Conclusion
Congratulations. You have successfully setup a working and clean IPv4/IPv6 Dual-Stack configuration with your Sophos UTM and KabelDeutschland. Happy surfing.