Guide for upgrading VMware ESXi (5.1 to 5.5U2)

Introduction
While i continiously have to deal with ESXi hypervisors in my Sysadmin job, i also have to take care of that they're up to date. And because it's a recurring task, updating an ESXi is quite easy as long as you pay attention to certain things.
This guide is about those nitty gritty details and how to update the ESXi Hypervisor only by using vSphere Client and the esxcli.
Start with the prerequisites
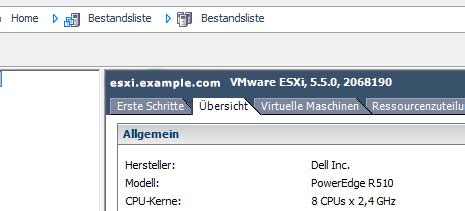
At first we should get the details about which version of ESXi we have running as well as its Image-Profile version. Turn on the vSphere Client and connect to your ESXi. Now select your ESXi in the left folder list and you can see your actual version on the blueish bar on the right which tell something like this:
esxi.example.com VMware ESXi, 5.1.0, 123456
In the General tab below you can find the Image Profile version as well. We will now update both of them.
To make sure you can update directly to the new version you want to have, check out the following Link for a update matrix. For us the update path from 5.1 directly to 5.5 Update 2 is possible.
Updating
ESXi Main Version
At first, make sure that SSH is enabled and allowed in the ESXi firewall. Now get the offline bundle package for the desired version, for exmaple:
update-from-esxi5.5-5.5_update02-2068190.zip
You can get those updates in your personal VMware portal!
Upload this to your hypervisors datastore via SCP or the vSphere clients built-in datastore manager and login to your esx command line afterwards:
ssh username@esxi.example.comNow migrate all your virtual machines to another hypervisor or shut them down. After you've done this put your esxi into maintenance mode to prevent automatic restarts of your VM's:
esxcli system maintenanceMode set –enable onThe next step is testing and if everything is fine there, finally installing it:
# Remove the --dry-run option to finally install the update
esxcli software vib update –depot=/vmfs/volumes/datastore1/update-from-esxi5.5-5.5_update02-2068190.zip --dry-run
If the update wen't successful, reboot the machine and recheck it's version which should be this one:
ESXi Image-Profile
You can skip this step, if your Image-Profile version has also been updated and look like this:

If not, let us update it from the esxcli again:
esxcli software profile update -d /vmfs/volumes/datastore1/update-from-esxi5.5-5.5_update02-2068190.zip -p ESXi-5.5.0-20140902001-standardAfter a reboot you should see the new Image-Profile. If not run the next command to remove all old Image-Profile traces while installing the new one (you can safely run the following command multiple times):
esxcli software profile install -d /vmfs/volumes/datastore1/update-from-esxi5.5-5.5_update02-2068190.zip -p ESXi-5.5.0-20140902001-standard –ok-to-removeAnother reboot later, your main and Image-Profile versions should be up to date.
Finalizing the Update
You're almost done!
The last thing you need to do is disabling the maintenance mode just by right-clicking the hypervisor in the folder list in the vSphere Client and select "Disable Maintenance mode". Now restart or migrate your virtual machines and you're done until the next update.