Proxmox 5 on Hetzner Root-Server with Dual-Stack IPv4/IPv6 for Host and Guests

Introduction
In an earlier blog post i wrote about a standard Debian installation with KVM, IPv4 and IPv6 for both the host and it's guests. This time we will setup Proxmox 5.x on a Hetzner Root-Server also using Debian and IPv4 and IPv6 for the Host and Guests.
Since the old blog post was missing some more explanations, i'll try to answer them here. The network setup for this guide can be used for a standard Debian as well with some minor modifications like naming the network bridge br0 instead of vmbr0 for example.
We will also mimic a default Proxmox 5.x installation with LVM-Thin Provisioning and the similar hard-disk layout.
Installing Debian Stretch
At first, we have to boot the Rescue-System in the Hetzner Robot for our new Root-Server. In this post i'll use a PX61-SSD Root-Server but the instructions should work the same for almost all other Hetzner Root-Servers available, like EX- or AX-series.
Use Linux with 64bit for the Rescue-System and reboot your server in order to start it. Remind the root password for the Rescue-System login if you haven't used your own public-key, which i always recommend.
After logging into the booted rescue image simply run installimage and choose Debian and the latest minimal Debian Stretch image available.
Partition Layout
In the installation configuration you can simply use the defaults but only set your own Hostname to your desired FQDN of your Host and the following partition layout which mimics the default Proxmox 5.x ISO installer.
At first comment out all defaults for PART and LV lines with a # and then add the following lines:
PART /boot ext4 512M
PART lvm pve all

LV pve swap swap swap 8G
LV pve root / ext4 100G
We will add the LVM-Thin Volume manually later, so press F10 to save and finish the configuration. Afterwards press yes twice to overwrite both /dev/sda and /dev/sdb with the new configuration and let it install our new Debian.
When it's done, simply reboot the machine.
Installing Proxmox 5.x over Debian Stretch
Now that we have a minimal Debian Stretch installation, we can continue installing Proxmox 5.x on top of it. For that, first run apt-get update && apt-get -y upgrade to install remaining upgrades, so we have a fully patched Debian.
Now let's add the Debian Stretch based Proxmox APT Repository by simply run the following command as root (or with sudo):
echo "deb http://download.proxmox.com/debian stretch pve-no-subscription" > /etc/apt/sources.list.d/pve-install-repo.listThere are now two ways to get the current GPG key. First you can get it by issuing the following command as root
wget http://download.proxmox.com/debian/proxmox-ve-release-5.x.gpg -O /etc/apt/trusted.gpg.d/proxmox-ve-release-5.x.gpgor you can do it manually and get the key from a trusted keyserver like below:
~$ apt-get -y install dirmngr
~$ gpg --recv-key --keyserver pool.sks-keyservers.net 0D9A1950E2EF0603
  gpg: /root/.gnupg/trustdb.gpg: trustdb created
  gpg: key 0D9A1950E2EF0603: public key "Proxmox Virtual Environment 5.x Release      Key " imported
  gpg: Total number processed: 1
  gpg:               imported: 1
~$ gpg --export -a 0D9A1950E2EF0603 | apt-key add -
  OK
Now update your APT Repository and do a full dist-upgrade using apt-get update && apt-get -y dist-upgrade
If GRUB asks for replacing the config, choose to install the maintainers version instead of keeping the locally modified one.
Now our system is prepared for the Proxmox Installation which we will start now by issuing apt-get -y install proxmox-ve ssh postfix ksm-control-daemon open-iscsi systemd-sysv.
If postfix asks for the type of your site, simply stick to the default Internet site and use the pre-filled FQDN as your System mail name.
After the installation, reboot your Server to your shiny new Proxmox 5.x to continue with the configuration
Configuring Proxmox 5.x
If you don't know the root password (for ex. if you used the public-key authentication) simply set a new one after the reboot by running passwd as root.
Also after rebooting the server, Proxmox added a new Enterprise APT Repository which we don't want, since we don't have any subscription. If you have one, leave it there, if not, remove it with rm /etc/apt/sources.list.d/pve-enterprise.list && apt-get update
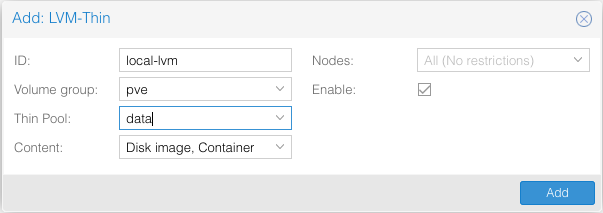
Add the LVM-Thin storage
At first, we will add the LVM-Thin storage to our new Proxmox Server. For that, create a new logical volume named data using the following commands. Since it's LVM, i'll only use 100G of space but this can be made larger at any time.
~$ lvcreate -L 100G -n data pve
~$ lvconvert --type thin-pool pve/data
After that, login to your shiny new Proxmox WebUI, login with root and click away the subscription warning.
Then, within Datacenter click on Storage and add a new LVM-Thin-type storage like shown below.
That's it. Let's continue with the network configuration.
Configuring the Network
What IP's do i get/need?
Please read the part What do i normally get from Hetzner? from my previous blog post first, to get an understanding of what you get from Hetzner.
The actual configuration of the network
As i said in the beginning, i've used mostly the same configuration from my old blog post but modified it to work for Debian Stretch and the current Hetzner Network. Below is my complete /etc/network/interfaces file with the explanations right below it.
# Loopback device:
auto lo
iface lo inet loopback
iface lo inet6 loopback

# device: enp0s31f6
auto enp0s31f6
iface enp0s31f6 inet static
  # Single Host IPv4 address
  address   140.194.250.23
  netmask   255.255.255.192
  # The Hetzner Gateway IP
  gateway   140.194.250.1
  # route 140.194.250.23/26 via 140.194.250.1
  up route add -net 140.194.250.0 netmask 255.255.255.192 gw 140.194.250.1 dev enp0s31f6

iface enp0s31f6 inet6 static
  # We gave our Host a single IPv6
  address 2a01:4f8:201:2122::2
  # /128 because our Bridge has the whole /64 Subnet!
  netmask 128
  # The Hetzner IPv6 Gateway
  gateway fe80::1

# VM-Bridge used by Proxmox Guests
auto vmbr0
iface vmbr0 inet static
  # Our Host will be the Gateway for all VM's
  address 140.194.250.23
  netmask 255.255.255.192
  # Some basic bridge configuration
  bridge_stp off
  bridge_ports none
  bridge_fd 0
  bridge_maxwait 0

  # Add all single IP's from your /29 subnet
  up route add -host 56.23.34.56 dev vmbr0
  up route add -host 56.23.34.57 dev vmbr0
  up route add -host 56.23.34.58 dev vmbr0
  up route add -host 56.23.34.59 dev vmbr0
  up route add -host 56.23.34.60 dev vmbr0
  up route add -host 56.23.34.61 dev vmbr0
  up route add -host 56.23.34.62 dev vmbr0
  up route add -host 56.23.34.63 dev vmbr0

iface vmbr0 inet6 static
  # Our Host again as the Gateway
  address 2a01:4f8:201:2122::2
  # Here we use the /64 subnet!
  netmask 64
You can simply copy and paste that configuration into your interfaces file, of course with your IP's you got from Hetzner. Make sure that you replace the interface name enp0s31f6 with the interface name of your Debian Stretch installation which you can find out by running ifconfig and check for an interface which is named similiar.
You can also read the corresponding part in my previous blog post for more information about the IP-Addresses used and what they mean.
In the last step, we need to enable IPv4/IPv6 forwarding, so our Guests can actually use the Host as their Gateway and communicate with the outside world.
Create a file called /etc/sysctl.d/99-networking.conf and insert the following contents
net.ipv4.ip_forward=1
net.ipv4.conf.enp0s31f6.send_redirects=0
net.ipv6.conf.all.forwarding=1
Be sure to replace the interface name in line 2 again with your own.
After that, reboot the machine and your network should be good to go. Next step is creating a new VM to see that the Dual-Stack communication works.
Downloading a first ISO image for testing
After that we're ready to install our first Virtual Machine. For that, we use a Debian Stretch Net-Install ISO image which we will download directly from our Proxmox Server, so we don't have to download it and re-upload it to our Proxmox server in the first place.
Go to /var/lib/vz/template/iso and download the image with wget https://cdimage.debian.org/debian-cd/current/amd64/iso-cd/debian-9.2.1-amd64-netinst.iso.
Now in your Proxmox WebUI go to your server and then to "local (xxx)" and within Content you should see your freshly downloaded ISO. Let's continue creating the VM.
Create a Proxmox Guest with IPv4 and IPv6 support
At the top right corner of your Proxmox WebUI click on Create VM and insert a name for your VM like testvm.
In the OS-Tab choose the ISO file you just downloaded and leave the Linux settings default if you install Debian Stretch.
In the Hard-Disk section replace SCSI with VirtIO Block and choose local-lvm if it's not already selected, choose the desired disk size and continue.
In the CPU tab choose the cores you need. Since we only have a Single-Socket Server it doesn't make sense to choose more than one socket and NUMA but instead only choose the number of Cores you want to assign to the VM. For maximum performance the Type should be Host, so the VM sees the actual Hosts CPU Name.
At the memory tab choose just 2048MB for our VM and continue with the network where you need to ensure that vmbr0 is preselected and use the VirtIO (paravirtualized) network adapter type.
Now confirm and finish the setup and start the VM and it's Console in the upper right corner of the Proxmox WebUI. You may want to change the keybord layout in the VM's Hardware Configuration tab to your own first, otherwise it can be hard to find special characters later in the Console.
Now just do a normal installation. The complete steps are not part of this post, so please refer to external resources if you haven't installed Debian before. I've used the non-graphical install.
At the step where the installer tries to get the network configuration via DHCP skip to the manual configuration and give the VM a temporary private IP like 192.168.1.1/32 and leave the Gateway and DNS Server fields blank. The network then tries to connect to the network and will time out. This is ok. We will now temporarily configure the network ourselves via a shell before we continue setting up the users and the rest of the installation.
When the Debian Installers asks for the root users password, press Escape to switch to the Installers menu. Select Open a shell here and let's configure the network manually now for the installer to reach the APT repositories for the installation. We also have to configure the network after the first reboot again statically.
In the shell run the following commands (without the comments after them):
~$ ip a # Shows our interfaces name, for example ens18
~$ ip a del 192.168.1.1 dev ens18 # removes our temporary private IP
~$ ip a add 56.23.34.56/32 peer 140.194.250.1 dev ens18 # adds public IP and pointopoint address
~$ ip route add default via 140.194.250.1 # adds default route, so we can reach the internet
In the last step, we need to add at least one DNS Server to the Debian Installers resolv.conf in order to reach the APT repositories:
~$ nano /etc/resolv.conf
nameserver 8.8.8.8
# nameserver
Save and close it and try to ping hetzner.de with ping hetzner.de. If this works, you can exit the shell with exit and continue with the menu step to configure the Users again and then follow the rest of the installation.
If you only want to use IPv6 in your guest you have to adapt the commands above slightly and leave the peer part. I haven't tested this setup but it should be easier than with IPv4. Ask in the comments if you need to know how.
Configure the network after the installation
After the installation reboot, login to your new VM as root and configure it's network manually like below. For this VM i simply choose the first free IPv4 from our /29 subnet and the next free IPv6 address after our Host's one.
# Loopback device:
auto lo
iface lo inet loopback
iface lo inet6 loopback

allow-hotplug ens18
iface ens18 inet static
  # Single Host IPv4 address
  address   56.23.34.56
  netmask   255.255.255.255
  gateway   140.194.250.1
  pointopoint 140.194.250.1

iface ens18 inet6 static
  address 2a01:4f8:201:2122::3
  netmask 64
  gateway 2a01:4f8:201:2122::2
Save that and then modify our /etc/resolv.conf and readd the default Hetzner nameservers:
nameserver 213.133.98.98
nameserver 213.133.99.99
nameserver 213.133.100.100
nameserver 2a01:4f8:0:a0a1::add:1010
nameserver 2a01:4f8:0:a102::add:9999
nameserver 2a01:4f8:0:a111::add:9898
Save that as well and reboot the machine. After the reboot your VM should be reachable via IPv4 and IPv6 from the outside.
Additional configurations
Since the Debian installer was unable to add a APT Repository, we have to add it manually and at least install an ssh server.
Open /etc/apt/sources.list and add the following lines there:
deb http://mirror.hetzner.de/debian/packages stretch main contrib non-free
deb http://mirror.hetzner.de/debian/security stretch/updates main contrib non-free
deb http://mirror.hetzner.de/debian/packages stretch-updates main contrib non-free

deb http://ftp.de.debian.org/debian stretch main contrib non-free
deb http://ftp.de.debian.org/debian stretch-updates main contrib non-free

deb http://security.debian.org/debian-security stretch/updates main contrib non-free
deb-src http://security.debian.org/debian-security stretch/updates main contrib non-free
Save and exit, then run apt-get update && apt-get -y install openssh-server sudo. It should install an SSH Server and the sudo package. Afterwards add your user to the sudo-Group with adduser <myUser> sudo and login with that username to your server. Then you can use sudo to do root-things on your shiny new VM with Dual-Stack networking
Conclusion
This guide showed how to install Proxmox 5.x and later to a Hetzner Root-Server with Dual-Stack IPv4/IPv6 Networking for both, the Host and the Guest-Machines.
I know that that configuring the network after the installation is kind of a drawback but it works nevertheless. I'll update this post if i have a better solution nevertheless.